小程序云函数运用

获取openid,appid,unionid
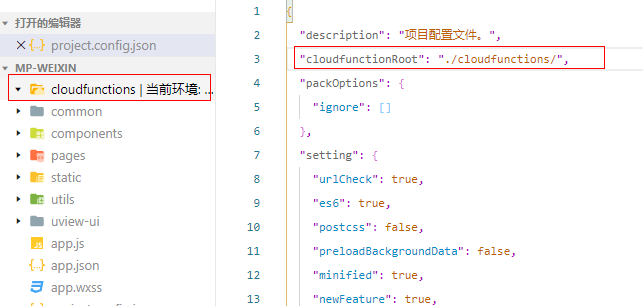
在项目根目录找到 project.config.json 文件,新增 cloudfunctionRoot 字段,指定本地已存在的目录作为云函数的本地根目录
示例:
{ "cloudfunctionRoot": "./cloudfunctions/" }


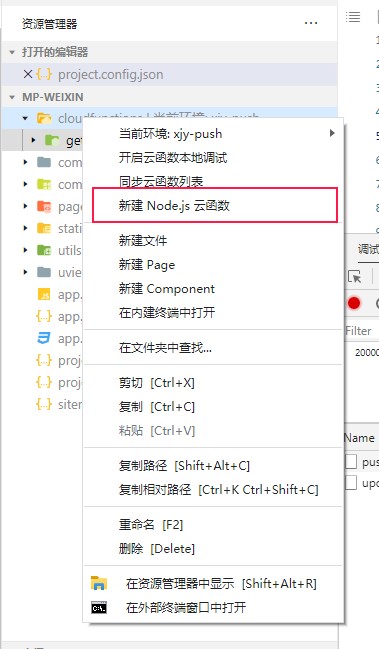
此处新建云函数,与在cloudfunctions文件夹函数名字的相同

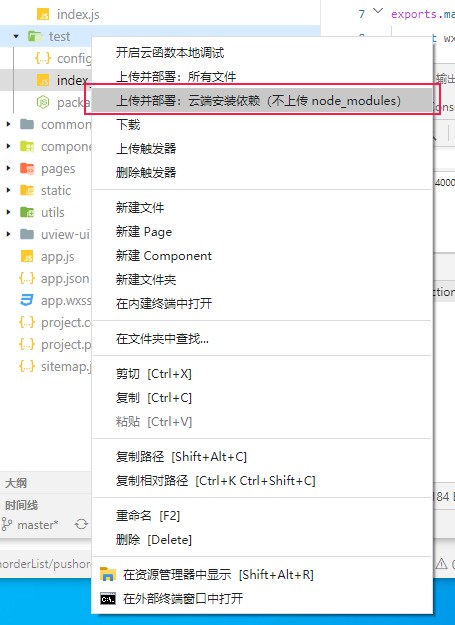
之后上传部署上去

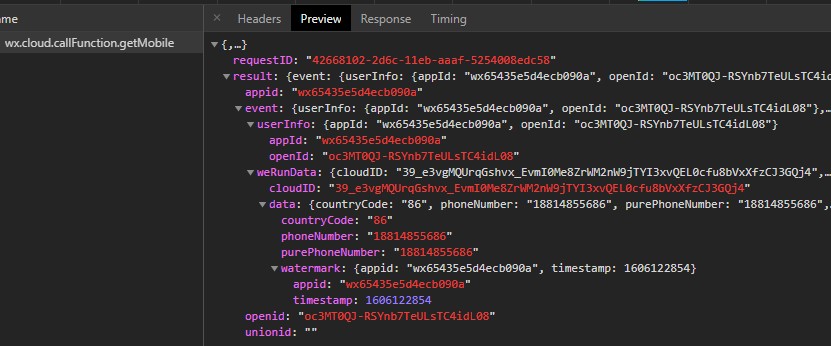
下面是一个云函数默认的index.js文件,新建完不用修改,可以拿到openid,appid,unionid,授权手机号后可以在event里面拿到手机号
- 1
- 2
- 3
- 4
- 5
- 6
- 7
- 8
- 9
- 10
- 11
- 12
- 13
- 14
- 15
- 16
// 云函数入口文件
const cloud = require('wx-server-sdk')

cloud.init()

// 云函数入口函数
exports.main = async (event, context) => {
  const wxContext = cloud.getWXContext()

  return {
    event,
    openid: wxContext.OPENID,
    appid: wxContext.APPID,
    unionid: wxContext.UNIONID,
  }
}
小程序端获取openid
- 1
- 2
- 3
- 4
- 5
- 6
wx.cloud.callFunction({
    name: 'getMobile',
    complete: res => {
        openId =  res.result.userInfo.openId;
    }
})
或Promise风格
- 1
- 2
- 3
- 4
- 5
- 6
- 7
- 8
- 9
- 10
- 11
- 12
- 13
wx.cloud.callFunction({
  // 云函数名称
  name: 'add',
  // 传给云函数的参数
  data: {
    a: 1,
    b: 2,
  },
})
.then(res => {
  console.log(res.result.openId;) // 3
})
.catch(console.error)
获取手机号
获取用户手机需要调用事件授权
- 1
<button class="quickLogin" open-type="getPhoneNumber" @getphonenumber="decryptPhoneNumber">
获取授权后将weRunData传送给云函数获取event对象
- 1
- 2
- 3
- 4
- 5
- 6
- 7
- 8
- 9
- 10
- 11
- 12
- 13
- 14
- 15
- 16
decryptPhoneNumber(e) {
    var that = this;
    wx.cloud
        .callFunction({
            name: "getMobile",
            data: {
                weRunData: wx.cloud.CloudID(e.detail.cloudID),
            },
        })
        .then((res) => {
            //获取用户手机
            let openid=res.result.openid
            let phoneNumber = res.result.event.weRunData.data.phoneNumber;
            console.log(phoneNumber)
            })

tips:记得在小程序页面初始化使用云函数
- 1
- 2
- 3
- 4
- 5
//云函数初始化
wx.cloud.init({
    env: envid, //这个是设置里面的环境id
    traceUser: true
})
(完)
0条看法
最新最后最热
等待你的评论


