x-ui使用Vless-TCP-XTLS-Vision

前言
去年10月,gfw加强了监测力度,我vps的每开放一个端口基本上第二天早上就会被封,之后我用了cloudflare代理之后一直用到现在,目前是没有被封。 但是使用cloudflare代理后你会发现网速变慢。特别是这几天,不知道是不是chatGPT影响造成的。 之后我去查询了下方法,其实网上的大牛门早在11月就推出了新方案VLESS-TCP-XTLS-Vision。而且早已经整合到了x-ui上面
其实基于 TLS 的代理在2017年就有相当成熟的应用了。2019年大规模封锁 Shadowsocks 服务以来,可以想见,审查者投入了极大人力物力算力,用了至少3年时间,才有了今天的技术。而截至目前的情况,我们看到仍然有误封,CDN大半存活,IPV6存活,以及从 Xray 项目的访问量以及 telegram 群在线人数屡创新高的情况来看,审查者本次阻绝信息的效果,实际上十分有限。
作为开发圈成员,可以毫不夸张的说,我们这群”破铜烂铁“的志愿者队伍,Shadowsocks,*ray,Trojan,Naive,Hystaria,Tuic,Sing,在此之前一直把审查者按在地上摩擦,还是花式的。
TLS 代理战争才刚刚开始,审查者之所以要动用 AI 手段,恰恰从侧面证明了以前的审查方式,包括主动检测对于 TLS 代理都是无效的。而我们面对 AI 对手,必须要在细节层面做的更好。
我们可以充分发挥己方的长处,集思广益,开源,分散特征。具体而言,作为代理工具和服务,可以直接过滤内层流量,这其实是我们对审查者的一个天然优势。利用这个信息差,Vision 的逻辑可以对关键的 TLS 握手包进行填充。这个思路跟 NaiveProxy 针对一些特定包的填充 是一致的。
感谢你耐心阅读本文,欢迎广大技术爱好者留言与我们交流,每一个留言和 idea 都将成为我们战斗的一份力量
最后 To @RPRX
青山不改 绿水长流 愿你归来仍是少年
感觉好热血,再次感谢这群”破铜烂铁“的志愿者。
x-ui简介
x-ui其实是xray的一个管理面板,具体功能也不再这里介绍了,github上写的很清楚。比较推荐大家看 https://github.com/FranzKafkaYu/x-ui 。
安装
debain11为例
开启BBR加速
- 1
- 2
- 3
echo "net.core.default_qdisc=fq" >> /etc/sysctl.conf
echo "net.ipv4.tcp_congestion_control=bbr" >> /etc/sysctl.conf
sysctl -p
更新软件源及安装组件
- 1
- 2
- 3
apt update
apt upgrade
apt install socat
安装Xray
- 1
bash -c "$(curl -L https://github.com/XTLS/Xray-install/raw/main/install-release.sh)" @ install
安装x-ui
- 1
bash <(curl -Ls https://raw.githubusercontent.com/FranzKafkaYu/x-ui/master/install.sh)
申请证书
申请证书其实还是一样流程,可以参考 我之前的文章 获取域名证书 当然也可以尝试下面板的一键申请。
面板配置
详见 https://github.com/FranzKafkaYu/x-ui 。
x-ui配置文件路径
- 1
/usr/local/x-ui/bin/config.json
---------------------分割线---------------------
下面是直接使用xray搭建节点,不使用x-ui(不需要看配置文件的就不用看了)
Vless-TCP-XTLS-Vision节点搭建
讲讲Vless-TCP-XTLS-Vision节点搭建,以debain11为例
安装Xray
- 1
bash -c "$(curl -L https://github.com/XTLS/Xray-install/raw/main/install-release.sh)" @ install
修改Xray配置文件(/usr/local/etc/xray/config.json)
- 1
- 2
- 3
- 4
- 5
- 6
- 7
- 8
- 9
- 10
- 11
- 12
- 13
- 14
- 15
- 16
- 17
- 18
- 19
- 20
- 21
- 22
- 23
- 24
- 25
- 26
- 27
- 28
- 29
- 30
- 31
- 32
- 33
- 34
- 35
- 36
- 37
- 38
- 39
- 40
- 41
- 42
- 43
- 44
- 45
- 46
- 47
- 48
- 49
- 50
- 51
- 52
- 53
- 54
- 55
- 56
- 57
- 58
- 59
- 60
- 61
- 62
- 63
- 64
- 65
- 66
- 67
- 68
- 69
- 70
- 71
- 72
- 73
- 74
- 75
- 76
- 77
- 78
- 79
- 80
- 81
- 82
- 83
- 84
- 85
- 86
- 87
- 88
- 89
- 90
- 91
- 92
- 93
- 94
- 95
- 96
- 97
- 98
- 99
- 100
- 101
- 102
- 103
- 104
- 105
- 106
- 107
- 108
- 109
- 110
- 111
- 112
- 113
- 114
- 115
- 116
- 117
- 118
- 119
- 120
- 121
- 122
- 123
- 124
- 125
- 126
- 127
- 128
- 129
- 130
- 131
- 132
- 133
- 134
- 135
- 136
- 137
- 138
- 139
- 140
- 141
- 142
- 143
- 144
- 145
- 146
- 147
- 148
- 149
- 150
- 151
- 152
- 153
- 154
- 155
- 156
{
    "log": {
        "loglevel": "warning"
    },
    "routing": {
        "domainStrategy": "IPIfNonMatch",
        "rules": [
            {
                "type": "field",
                "ip": [
                    "geoip:cn",
                    "geoip:private"
                ],
                "outboundTag": "block"
            }
        ]
    },
    "inbounds": [
        {
            "port": 443,   //端口
            "protocol": "vless",  //协议类型
            "settings": {
                "clients": [
                    {
                        "id": "uuid",  //替换为你的uuid
                        "flow": "xtls-rprx-vision"   //流控
                    }
                ],
                "decryption": "none",
                "fallbacks": [
                    {
                        "dest": 10010,   //Trojan协议的分流端口
                        "xver": 1
                    },
                    {
                        "path": "/vlessws",    //vless+ws的分流路径
                        "dest": 10011,      //分流端口
                        "xver": 1
                    },
                    {
                        "path": "/vmessws",   //vmess+ws的分流路径
                        "dest": 10012,    //分流端口
                        "xver": 1
                    }
                ]
            },
            "streamSettings": {
                "network": "tcp",
                "security": "tls",
                "tlsSettings": {
                    "rejectUnknownSni": true,   //服务端接收到的 SNI 与证书域名不匹配即拒绝 TLS 握手
                    "fingerprint": "chrome",    //TLS指纹伪装,伪装为chrome浏览器指纹
                    "allowInsecure": false,   //不允许不安全连接(仅用于客户端)
                    "alpn": [
                        "http/1.1","h2"
                    ],
                    "certificates": [
                        {
                            "ocspStapling": 3600,   //OCSP 装订更新,与证书热重载的时间间隔
                            "certificateFile": "/root/.acme.sh/dklovezjh.xyz_ecc/fullchain.cer",   //证书位置,绝对路径
                            "keyFile": "/root/.acme.sh/dklovezjh.xyz_ecc/dklovezjh.xyz.key"   //私钥位置,绝对路径
                        }
                    ]
                }
            },
            "sniffing": {
                "enabled": true,
                "destOverride": [
                    "http",
                    "tls"
                ]
            }
        },
        {
            "port": 10010,   //trojan节点的分流端口
            "listen": "127.0.0.1",
            "protocol": "trojan",
            "settings": {
                "clients": [
                    {
                        "password": "pass"  //替换为你的密码
                    }
                ],
                "fallbacks": [
                    {
                        "alpn": "h2",  //h2回落
                        "dest": 8001,   //h2回落端口
                        "xver": 1
                    },
                    {
                       "dest": 8002,  //http/1.1回落端口
                       "xver": 1
                    }
                ]
            },
            "streamSettings": {
                "network": "tcp",
                "security": "none",
                "tcpSettings": {
                    "acceptProxyProtocol": true
                }
            }
        },
        {
            "port": 10011,   //vless+ws节点的分流端口
            "listen": "127.0.0.1",
            "protocol": "vless",
            "settings": {
                "clients": [
                    {
                        "id": "uuid"   //替换为你的uuid
                    }
                ],
                "decryption": "none"
            },
            "streamSettings": {
                "network": "ws",
                "security": "none",
                "wsSettings": {
                    "acceptProxyProtocol": true,   //若使用Nginx/Caddy等反代WS,需要删掉这行
                    "path": "/vlessws"   //ws的路径,需要和分流的一致
                }
            }
        },
        {
            "port": 10012,   //vmess+ws节点的分流端口
            "listen": "127.0.0.1",
            "protocol": "vmess",
            "settings": {
                "clients": [
                    {
                        "id": "uuid"   //替换为你的uuid
                    }
                ]
            },
            "streamSettings": {
                "network": "ws",
                "security": "none",
                "wsSettings": {
                    "acceptProxyProtocol": true,   //若使用Nginx/Caddy等反代WS,需要删掉这行
                    "path": "/vmessws"   //ws的路径,需要和分流的一致
                }
            }
        }
    ],
    "outbounds": [
        {
            "protocol": "freedom",
            "tag": "direct"
        },
        {
            "protocol": "blackhole",
            "tag": "block"
        }
    ]
}
json文件记得删除注释
nginx配置(/etc/nginx/nginx.json)
- 1
- 2
- 3
- 4
- 5
- 6
- 7
- 8
- 9
- 10
- 11
- 12
- 13
- 14
- 15
- 16
- 17
- 18
- 19
- 20
- 21
- 22
- 23
- 24
- 25
- 26
- 27
- 28
- 29
- 30
- 31
- 32
- 33
- 34
- 35
- 36
- 37
- 38
- 39
- 40
- 41
- 42
- 43
- 44
- 45
- 46
- 47
- 48
- 49
- 50
- 51
- 52
- 53
- 54
- 55
user www-data;
worker_processes auto;
pid /run/nginx.pid;
include /etc/nginx/modules-enabled/*.conf;

events {
    worker_connections 768;
}

http {
    include mime.types;
    default_type application/octet-stream;
    sendfile on;
    keepalive_timeout 65;

    server {
        listen 80 default_server;
        listen [::]:80 default_server;
        return 301 https://$host$request_uri;    #HTTP自动跳转HTTPS
    }

    server {
        listen 127.0.0.1:82 proxy_protocol default_server;
        listen 127.0.0.1:81 http2 proxy_protocol default_server;
        set_real_ip_from 127.0.0.1;
        real_ip_header proxy_protocol;
        server_name _;
        return 404;
    }     #限定域名访问,返回404

    server {
        server_name your-domain-name.com; #你的域名
        listen 127.0.0.1:8002 proxy_protocol; #HTTP/1.1本地监听端口
        listen 127.0.0.1:8001 http2 proxy_protocol; #H2本地监听端口
        set_real_ip_from 127.0.0.1;
        real_ip_header proxy_protocol;

        location / {
            add_header Strict-Transport-Security "max-age=31536000; includeSubDomains; preload" always; #启用HSTS
            proxy_pass https://www.bing.com; #伪装网址
            proxy_ssl_server_name on;
            proxy_redirect off;
            sub_filter_once off;
            sub_filter "www.bing.com" $server_name; #伪装网址
            proxy_set_header Host "www.bing.com"; #伪装网址
            proxy_set_header Referer $http_referer;
            proxy_set_header X-Real-IP $remote_addr;
            proxy_set_header User-Agent $http_user_agent;
            proxy_set_header X-Forwarded-For $proxy_add_x_forwarded_for;
            proxy_set_header X-Forwarded-Proto https;
            proxy_set_header Accept-Encoding "";
            proxy_set_header Accept-Language "zh-CN";
        }
    }
}
nginx服务相关命令
- 1
- 2
- 3
- 4
- 5
#重新加载
systemctl reload nginx

#启动状态
systemctl status nginx.service
xray服务相关命令
- 1
- 2
- 3
- 4
- 5
#重启
systemctl restart xray

#启动状态
systemctl status xray
修改Xray开机自启配置信息(/etc/systemd/system/xray.service)
- 1
- 2
- 3
- 4
- 5
- 6
- 7
- 8
- 9
- 10
- 11
- 12
- 13
- 14
- 15
- 16
- 17
- 18
[Unit]
Description=Xray Service
Documentation=https://github.com/xtls
After=network.target nss-lookup.target

[Service]
User=root
CapabilityBoundingSet=CAP_NET_ADMIN CAP_NET_BIND_SERVICE
AmbientCapabilities=CAP_NET_ADMIN CAP_NET_BIND_SERVICE
NoNewPrivileges=true
ExecStart=/usr/local/bin/xray run -config /usr/local/etc/xray/config.json
Restart=on-failure
RestartPreventExitStatus=23
LimitNPROC=10000
LimitNOFILE=1000000

[Install]
WantedBy=multi-user.target
重新加载守护进程
- 1
systemctl daemon-reload
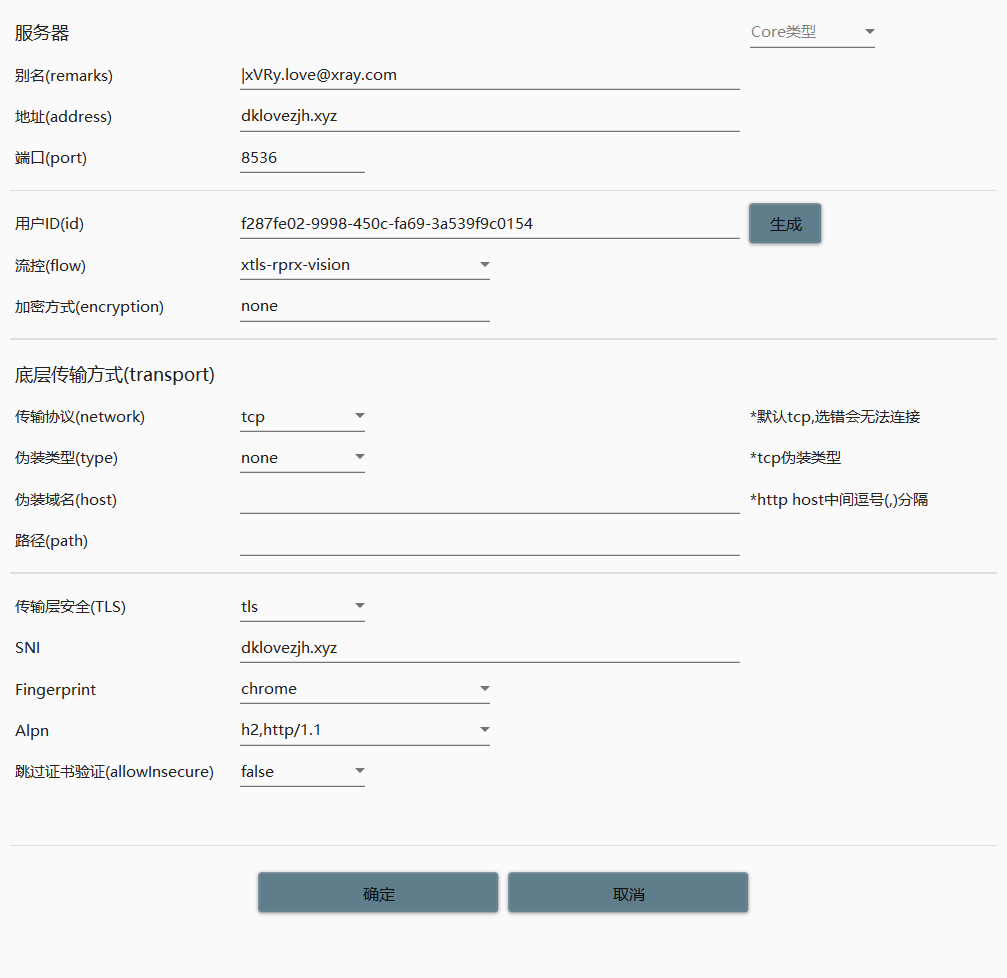
windows客户端配置
客户端记得把v2rayN升级到6以上。点击检查更新把xray-core也升级。

小提示
- 搭建前优先检查下防火墙,把该开的端口放开
- 1
- 2
- 3
ufw status
ufw enable //开启
ufw disable //关闭
- 多检查下nginx和xray的启动状态,看有没有正常运行


